

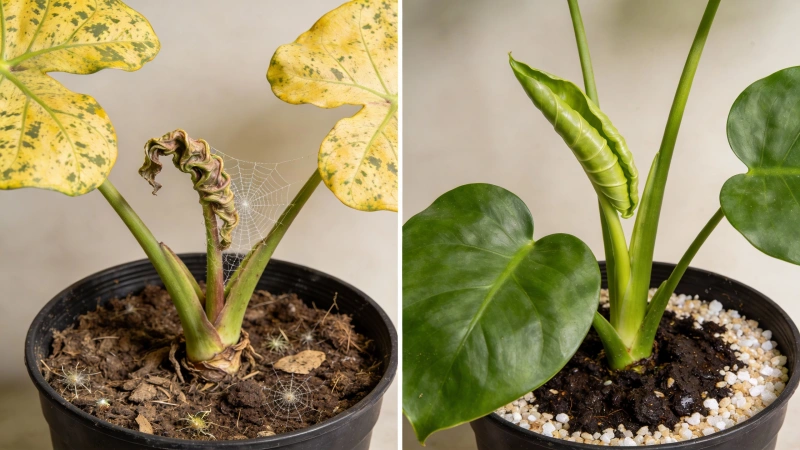
I’ll never forget the day I found spider mites on my prized Alocasia. That sinking feeling when you notice those tiny webs between the leaves? Yeah, I know it well.
As a houseplant enthusiast with over 30 plants in my collection, I’ve battled spider mites more times than I’d like to admit. And I’ve learned the hard way that killing them isn’t hard—keeping them gone is the real challenge.
Here’s what most guides won’t tell you: treating spider mites once is basically useless. These microscopic pests reproduce so fast that a single survivor can restart the whole infestation in days.
In this guide, I’m sharing the exact 7-step method I used to eliminate spider mites from three plants last winter—plus the mistakes that cost me precious time (so you can avoid them). Whether you’re dealing with a minor outbreak or a full-blown infestation, you’ll find actionable solutions here.
🌿 Quick Answer
To get rid of spider mites: First, isolate the infected plant immediately. Then spray it thoroughly with water to dislodge the mites. Follow up with a treatment of neem oil (1 tbsp neem oil + 1 tsp dish soap + 1 quart water) or insecticidal soap. The critical step most people skip? Repeat the treatment every 3 days for at least 2 weeks to break their breeding cycle. Increase humidity to prevent future outbreaks.
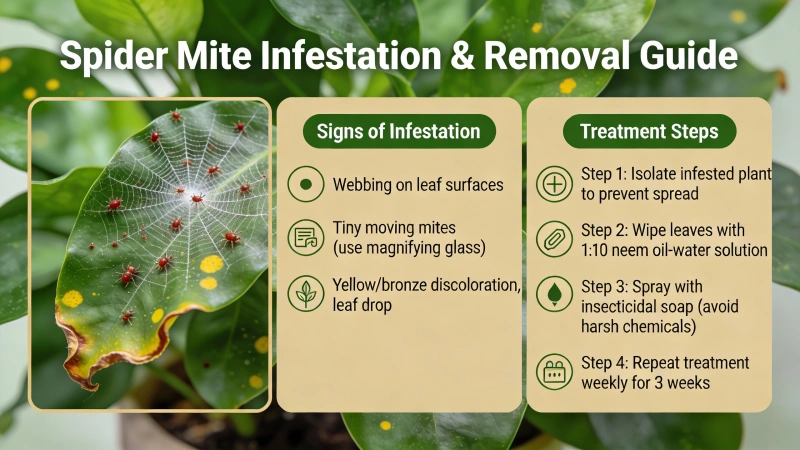
What Are Spider Mites and How to Identify Them
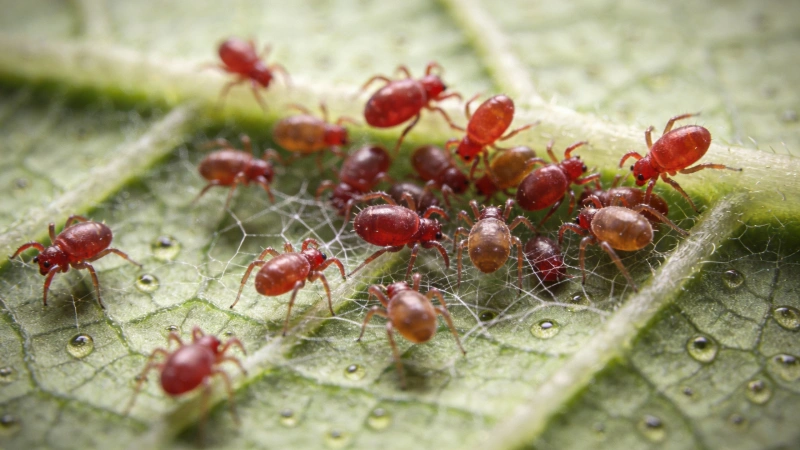
Spider mites aren’t actually spiders—they’re tiny arachnids related to ticks. And I mean tiny. Most are smaller than the period at the end of this sentence.
That’s exactly why they’re so dangerous. By the time you notice them, they’ve usually been munching on your plant for weeks.
According to Colorado State University Extension, the two-spotted spider mite is the most common species affecting houseplants. They pierce plant cells with their tiny mouthparts and suck out the contents, causing that distinctive stippled or speckled look on leaves.
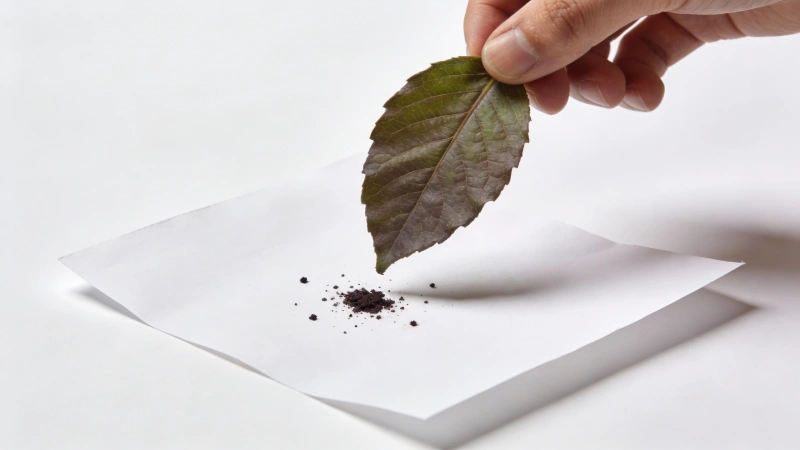
The White Paper Test
Here’s my go-to identification method: Hold a white piece of paper under a suspicious leaf and gently tap it. If you see tiny specks moving on the paper—like crawling pepper flakes—you’ve got spider mites.
Other telltale signs include:
- Yellow or bronze stippling on leaves (like tiny dots)
- Fine webbing between leaves and stems
- Leaves that look dusty or dirty
- White dots on leaf undersides (those are eggs)
- Leaves dropping despite proper care
Where Do Spider Mites Come From?
If you’re wondering how these pests got into your home, you’re not alone. I asked myself the same question when my infestation appeared out of nowhere.
The truth? Spider mites have multiple entry points:
- New plants from the store – The most common source. Eggs can hide on leaves for weeks before hatching.
- Open windows – They’re light enough to float in on air currents.
- Your clothes, pets, or tools – They hitchhike like tiny invisible travelers.
- Contaminated potting soil – Though less common, it happens.
Plants Most Vulnerable to Spider Mites
In my experience, these plants are spider mite magnets:
- Alocasia (my poor Polly never stood a chance)
- Calathea and Maranta (prayer plants)
- Palms (especially Parlor Palms)
- Ficus (including Fiddle Leaf Figs)
- Crotons
- Ivy
Interestingly, plants with thick, waxy leaves like succulents and Hoyas seem more resistant. If you’ve been dealing with droopy or stressed plants, they’re even more vulnerable—spider mites love weakened victims. Speaking of plant health, if you notice your plants drooping, check out my guide on Why Is My Peace Lily Drooping to rule out other causes before assuming it’s pests.
Signs of Spider Mite Damage on Plants
Spider mite damage is sneaky. It often looks like a watering problem or nutrient deficiency before you realize it’s pests.
Here’s what to watch for at each stage:
Early Stage
- Tiny yellow or white dots on leaves (stippling)
- Leaves look slightly dull or dusty
- No visible webbing yet
Moderate Stage
- Visible fine webbing, especially where leaves meet stems
- Leaves turning yellow or bronze
- Stunted new growth
Severe Stage
- Heavy webbing covering multiple leaves
- Leaves curling, browning, and falling off
- Plant visibly struggling to survive
If your plant’s leaves are turning yellow and you’re not sure why, it might be spider mites—or something else entirely. I’ve written a detailed breakdown of all the causes in Why Is My Plant Turning Yellow to help you diagnose the issue.
How to Get Rid of Spider Mites: 7 Proven Steps
After losing a few plants to these pests (and saving many more), I’ve developed a systematic approach that actually works. Here’s my battle-tested method:
Step 1: Isolate the Infected Plant Immediately
The moment you suspect spider mites, move that plant away from your other greenery. I’m serious—don’t wait until tomorrow.
Spider mites can travel between plants that are touching. They can even “balloon” on air currents to reach nearby plants.
I typically quarantine infected plants in my bathroom. The higher humidity there actually helps weaken the mites, and it keeps them far from my plant shelf.
Step 2: Give Your Plant a Thorough Shower
This is your first line of attack. Take your plant to the sink or shower and blast it with lukewarm water.
Focus especially on the undersides of leaves—that’s where spider mites love to hide and lay eggs.
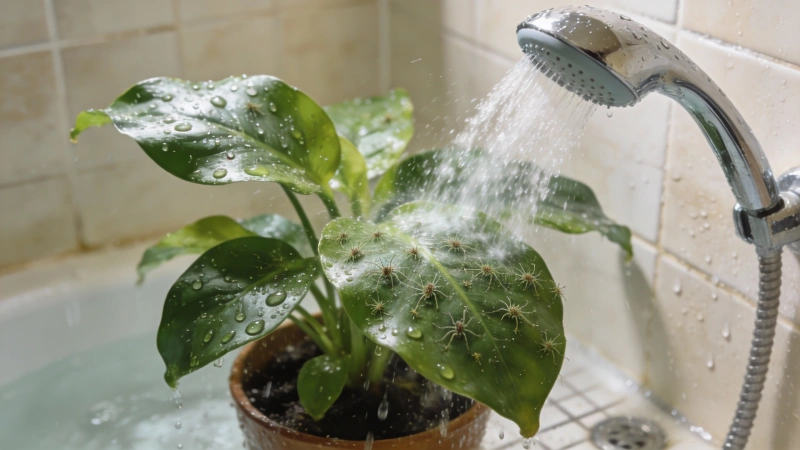
I wrap a plastic bag around the pot to prevent overwatering the soil. Then I use my shower head on a medium setting, methodically spraying every inch of the plant.
A NYC plant consultant once told me something that stuck with me: “If you’re thorough enough, sometimes a single rinse can solve the problem.” The key word is thorough—every surface should be dripping wet.
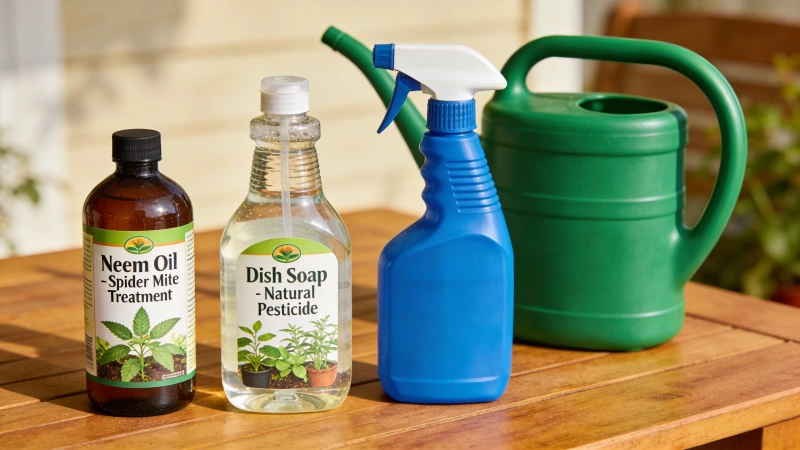
Step 3: Apply a Soap Solution
After the shower treatment dries, it’s time for soap. This is cheap, effective, and probably already in your kitchen.
My DIY Recipe:
- 1 teaspoon mild dish soap (I use Dawn)
- 1 quart (about 1 liter) lukewarm water
- Mix well in a spray bottle
Spray every surface of your plant generously. The soap breaks down the mites’ protective coating, causing them to dehydrate and die.
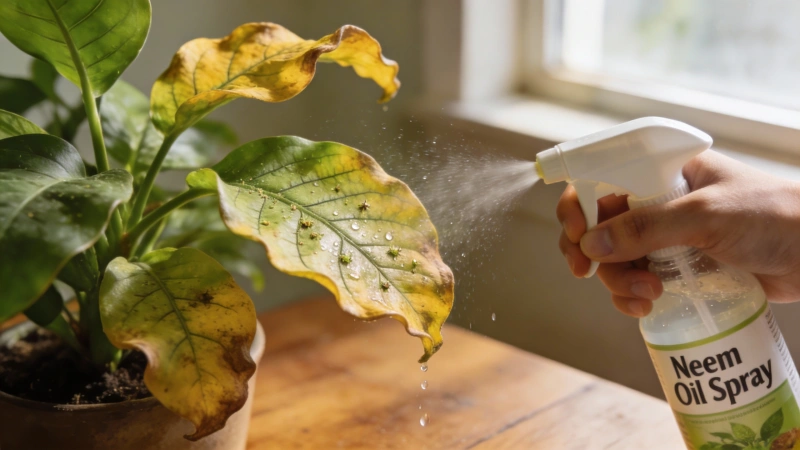
Step 4: Apply Neem Oil Treatment (My Top Recommendation)
If I had to choose just one spider mite treatment, it would be neem oil. It kills adult mites, suffocates eggs, AND disrupts their reproduction cycle.
Comment
byu/Halfrican_King from discussion
incarnivorousplants
My Neem Oil Recipe:
- 1 tablespoon pure neem oil (cold-pressed works best)
- 1 teaspoon liquid dish soap (as emulsifier)
- 1 quart lukewarm water
- Shake vigorously before each use
According to University of Minnesota Extension, horticultural oils like neem work by suffocating mites and their eggs. They’re effective and much safer than synthetic pesticides for indoor use.
DIY Treatment Comparison
| Method | Recipe | Pros | Cons | Frequency |
|---|---|---|---|---|
| Soap Water | 1 tsp dish soap + 1 quart water | Cheap, readily available | Doesn’t kill eggs | Every 3 days |
| Neem Oil | 1 tbsp neem + 1 tsp soap + 1 quart water | Kills mites AND eggs, disrupts breeding | Strong smell, can burn in sunlight | Every 7 days |
| Rubbing Alcohol | 70% isopropyl alcohol (direct application) | Instant kill on contact | Can damage sensitive leaves | As needed |
| Alcohol + Soap Mix | 2 parts alcohol + 5 parts water + 1 tsp soap | Effective combination | Test on one leaf first | Every 3-5 days |
Step 5: Use Rubbing Alcohol for Spot Treatment
For targeted attacks on visible mites or heavy webbing, rubbing alcohol works fast.
Dip a cotton swab or cotton ball in 70% isopropyl alcohol and wipe down affected areas. The alcohol kills mites on contact by dissolving their protective outer layer.
Step 6: Consider Commercial Products for Severe Infestations
If natural methods aren’t cutting it, there are effective commercial options. Based on what’s worked for me and what I’ve seen recommended in plant communities:
- Captain Jack’s Dead Bug Brew – Contains spinosad, highly effective against mites
- Bonide Insecticidal Soap – Ready-to-use, good for moderate infestations
- Bonide Systemic Houseplant Insect Control – Absorbed by roots, protects from the inside out
Important: Many standard insecticides don’t work on spider mites because they’re arachnids, not insects. Always check that the product label specifically mentions “mites” or “spider mites.”
While we’re talking about pest control, if you’re dealing with multiple bug issues, you might also want to read my guide on How to Get Rid of Fungus Gnats in Plants—another common houseplant nuisance.
Step 7: Repeat Treatment—This Is Non-Negotiable
This step is where most people fail. They treat once, see improvement, and stop. Then the mites come roaring back.
Why repetition matters: Spider mites go from egg to breeding adult in just 5 days. No single treatment kills all eggs. You MUST repeat to catch newly hatched mites before they can lay more eggs.
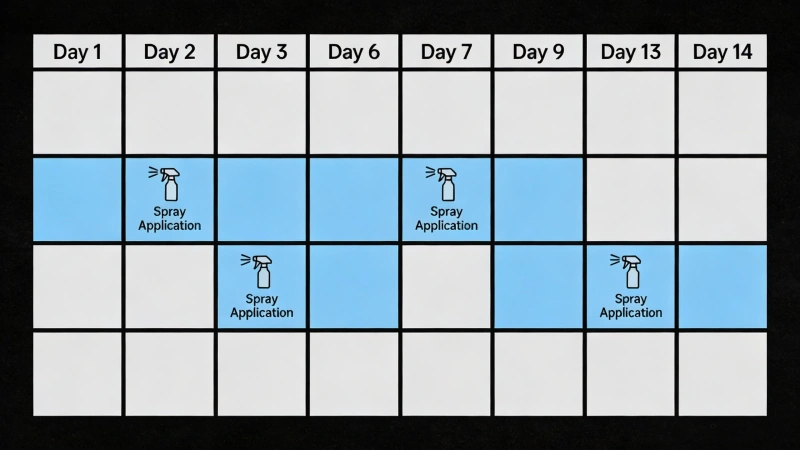
Recommended Treatment Schedule
| Infestation Level | Signs | Treatment Frequency | Expected Timeline |
|---|---|---|---|
| Light | Some stippling, no visible webbing | Every 3 days | 1-2 weeks |
| Moderate | Visible webbing, multiple affected leaves | Every 3 days | 3-4 weeks |
| Severe | Heavy webbing, significant leaf damage | Every 2 days | 4-6 weeks |
| Prevention | No symptoms (post-treatment) | Every 2 weeks | Ongoing |
Comment
byu/Alaskaferry from discussion
inhouseplants
My Spider Mite Battle: A Real Story
The Setup
I’m a houseplant enthusiast with about 30 plants. Winter 2023, around a month after turning on the heat, I noticed something off with my beloved Alocasia Polly. A few leaves looked… speckled. Dusty. Wrong.
The Discovery
At first, I assumed it was a humidity issue—winter air is brutal on tropical plants. But after a few days, I saw them: tiny webs between the leaf stems.
My heart sank. I grabbed my phone flashlight and inspected the undersides. Sure enough—microscopic dots were moving. Spider mites. And not just on the Alocasia. My Calathea and a nearby parlor palm were already showing early signs too.
My First (Failed) Attempt
I panicked and immediately rinsed all three plants in the shower. Then I mixed up some neem oil spray and treated them once.
One week later? The situation was worse. More webbing. More damage. The mites had multiplied despite my efforts.
What Actually Worked
I realized my mistake: treating once wasn’t enough. I needed a battle plan.
Here’s what I did:
- Moved all three plants to the bathroom for quarantine
- Set up a strict schedule: shower rinse + neem oil spray every 3 days
- Treated my “healthy” plants preventatively once per week
- Added a humidifier to my plant corner (mites hate humidity above 60%)
- Wiped down leaves with a damp cloth between treatments
The Results
After 5 weeks of consistent treatment, the webbing was completely gone. New leaves emerged healthy. I lost about 10 severely damaged leaves total, but all three plants survived.
That was over a year ago. I’ve had zero outbreaks since—and I credit the humidifier and my new habit of inspecting leaves weekly.
My Biggest Lesson
Spider mites aren’t hard to kill. The hard part is killing them consistently, long enough to break their breeding cycle. One treatment means nothing. Two weeks of treatment means everything.
How to Prevent Spider Mites From Coming Back
After going through that nightmare, I got serious about prevention. Here’s what actually works:
1. Increase Humidity
Spider mites thrive in dry conditions. They absolutely hate humidity.
I keep my plant area at 60-70% humidity now using a warm mist humidifier. Since making this change? Zero outbreaks. It’s the single most effective prevention method I’ve found.
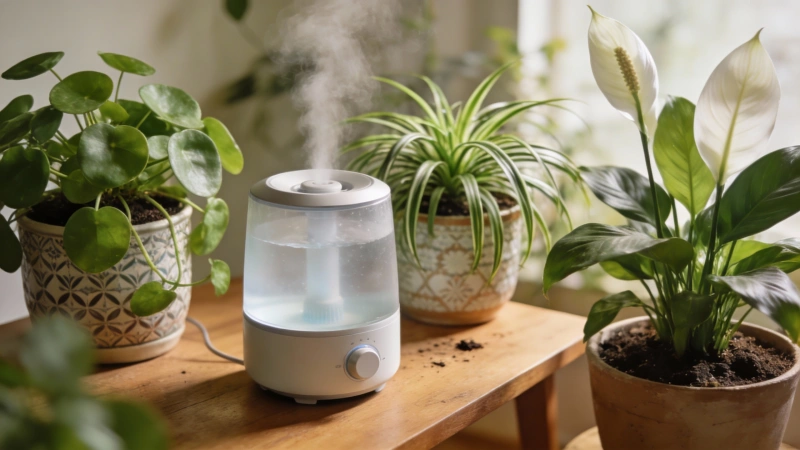
Other humidity boosters:
- Pebble trays filled with water under your pots
- Grouping plants together
- Misting (though this is temporary and not as effective)
2. Inspect and Wipe Leaves Regularly
I now check my plants weekly during watering. It takes 2 minutes per plant. I look at leaf undersides, check stem joints, and keep an eye out for any stippling.
Monthly, I wipe down all leaves with a damp microfiber cloth. This removes dust (which mites love), keeps leaves clean for better photosynthesis, and catches problems early.
3. Quarantine New Plants
Every new plant gets a 2-week quarantine in a separate room. No exceptions. During that time, I inspect it several times and often give it a preventative neem oil treatment.
This single habit has probably saved me from multiple infestations.
4. Keep Your Plants Healthy
Healthy plants are more resistant to pests. Stressed plants practically invite spider mites.
Make sure your plants have proper light, correct watering schedules, and occasional fertilizing. If a plant is already struggling, check out my guide on How to Save a Dying Plant for recovery tips before pests become an issue.
7 Common Mistakes to Avoid
I’ve made most of these mistakes myself. Learn from my failures:
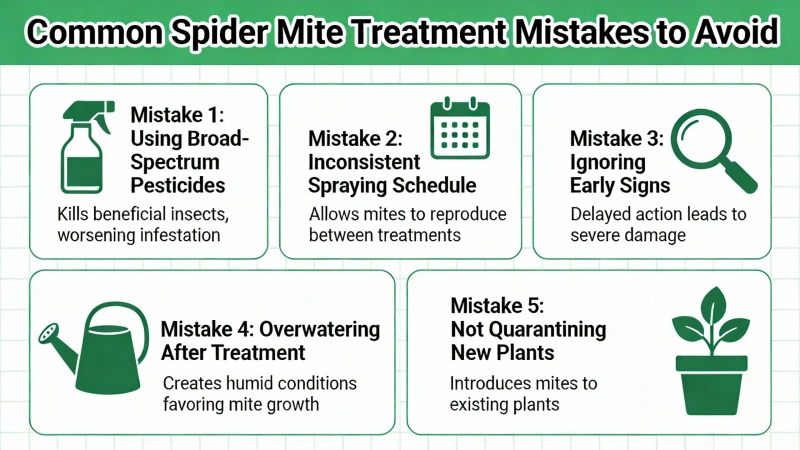
- Only treating once – This is the #1 reason people fail. Spider mites reproduce every 5 days. One treatment can’t win.
- Ignoring leaf undersides – This is where 90% of mites live and breed. If you’re only spraying the tops, you’re missing the problem.
- Using neem oil in sunlight – The oil heats up and burns leaves. Always apply in evening or on cloudy days.
- Using the wrong products – Many insecticides don’t kill mites because they’re arachnids. Check labels carefully.
- Not isolating infected plants – One infested plant can spread mites to your entire collection within days.
- Relying on misting for humidity – Misting raises humidity for maybe 30 seconds. You need sustained humidity. Get a humidifier.
- Stopping treatment too early – Even when you think they’re gone, keep treating for another week. Trust me on this one.
Frequently Asked Questions
How long does it take to get rid of spider mites completely?
For a light infestation, expect 1-2 weeks of consistent treatment. Moderate cases take 3-4 weeks. Severe infestations can require 6+ weeks of effort. The key is continuing treatment even after you stop seeing active mites—eggs can take time to hatch.
Can spider mites spread to humans or pets?
No. Spider mites only feed on plants and can’t survive on humans or animals. However, always use treatment products safely—keep neem oil and other solutions away from children and pets during application, and let treated plants dry before returning them to living spaces.
Should I throw away a plant with spider mites?
Not necessarily. Most infestations can be treated successfully with patience and consistency. However, if a plant is 80%+ damaged, heavily webbed, and you have other plants at risk, sometimes it’s smarter to let it go and protect your healthy plants.
Do spider mites live in the soil?
Spider mites primarily live on plant leaves and stems, not in soil. However, eggs can fall into the top layer of soil. For severe infestations, replacing the top inch of soil and treating the surface can help eliminate stragglers.
What plants are most resistant to spider mites?
Plants with thick, waxy leaves tend to resist spider mites better. Succulents, Hoyas, and rubber plants are generally less susceptible. Plants with thin, delicate foliage (like Calathea, Alocasia, and palms) are spider mite favorites.
Helpful Video Tutorial
If you prefer visual learning, this video demonstrates how to identify and treat spider mites step by step: 十点半
Final Thoughts
Spider mites are frustrating, but they’re absolutely beatable. The secret isn’t finding some magic product—it’s simple consistency.
Quick recap:
- Isolate infected plants immediately
- Treat with water rinse + neem oil or soap solution
- Repeat every 3 days for at least 2 weeks
- Maintain humidity above 60% to prevent future outbreaks
- Inspect plants weekly as part of your routine
I thought my Alocasia was a goner when I found those mites. Five weeks of consistent treatment later, she’s thriving with new leaves unfurling every month. If I can do it, so can you.
Have you battled spider mites before?
I’d love to hear what worked (or didn’t work) for you. Drop a comment below and share your experience—your tips might help another plant parent save their green babies!
This article was created by a professional team. AI tools were used during the research and writing process to enhance efficiency and quality. All information has undergone manual verification and editing to ensure accuracy and practicality. We are committed to providing readers with objective and valuable content.
Publisher::meiruth558@gmail.com,Please indicate the source when reposting:https://gardeningtoolsgarden.com/how-to-get-rid-of-spider-mites/