Last updated: May 2026 · Written from rescuing more than a dozen plants from root rot — including a Golden Pothos that looked completely hopeless
I’ll never forget the smell. That sour, rotten-egg stench rising from my favorite Golden Pothos as I lifted it from its pot. My stomach dropped when I saw the roots — black, mushy, falling apart in my hands.
If you’re reading this, you probably know that feeling. The panic of realizing your plant might be dying. The confusion of not knowing if you can save it.
Here’s the good news: root rot is treatable. I’ve rescued more than a dozen plants from the brink of death, including that Pothos that looked completely hopeless. The key is acting fast and following the right steps.
In this guide, I’ll walk you through everything I’ve learned about root rot treatment — from identifying the problem to the exact 7-step process I use to save infected plants. I’ll also share my own rescue story, complete with the mistakes I made and how I fixed them.
Success depends on catching it early. If more than 50% of roots are damaged, consider taking stem cuttings as backup. The full step-by-step treatment process is detailed below.
What Is Root Rot? Understanding the Silent Plant Killer
Root rot is exactly what it sounds like — your plant’s roots are literally rotting away. It’s caused by fungal pathogens (most commonly Pythium and Phytophthora) or bacteria that thrive in waterlogged, oxygen-deprived soil.
According to the University of Wisconsin Horticulture Extension, root rot fungi can remain dormant in soil for extended periods, only becoming active when conditions are right — namely, when soil stays too wet for too long.
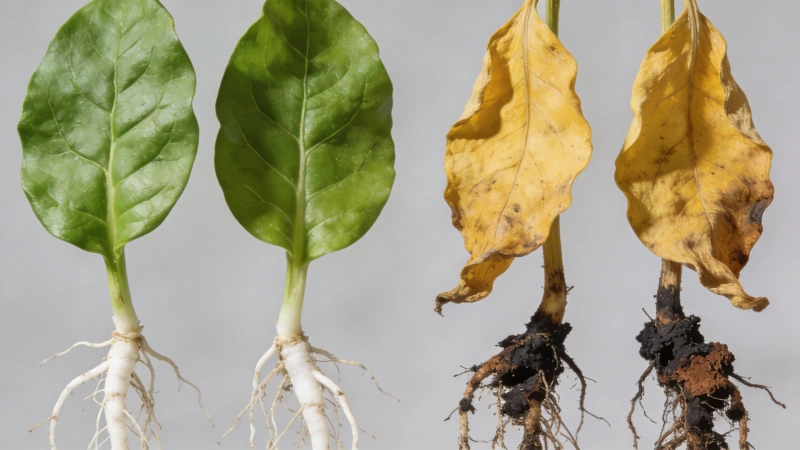
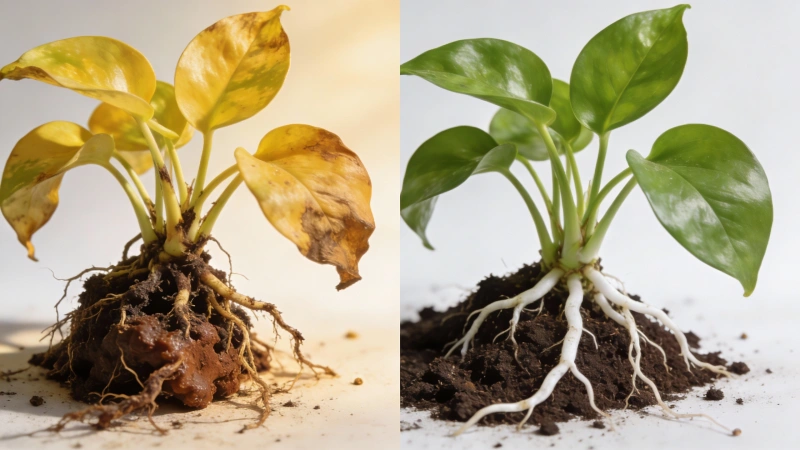
What makes root rot so dangerous is that it’s a silent killer. The damage happens underground, out of sight. By the time you notice yellowing leaves or wilting, the root system may already be severely compromised.
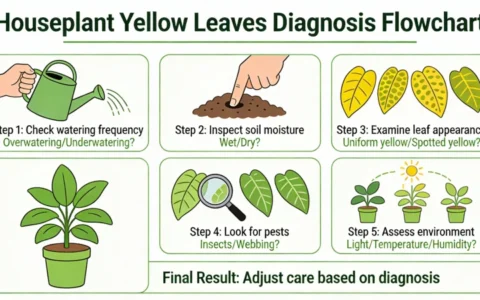
How to Identify Root Rot: Signs You Shouldn’t Ignore
Above-Ground Symptoms (Easy to Confuse)
The tricky part about root rot is that the symptoms look a lot like other problems. Here’s what to watch for:
- Yellowing leaves — especially lower leaves first
- Wilting even when soil is wet — this is a major red flag
- Stunted growth — the plant just seems stuck
- Leaves dropping — sometimes without turning yellow first
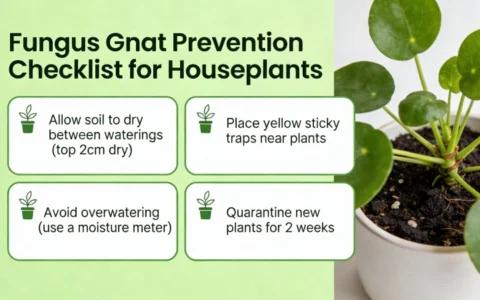
- Fungus gnats — those tiny black flies love wet soil and can actually spread root rot!
Wilting is one of the most confusing symptoms because it can mean overwatering OR underwatering. If your plant is drooping even with wet soil, root rot is likely the culprit. Peace lilies are especially prone to this — if you have one, my guide on why a peace lily droops covers more diagnostic tips.
Below-Ground Symptoms (Confirmation)
The only way to confirm root rot is to check the roots themselves. Here’s what you’re looking for:
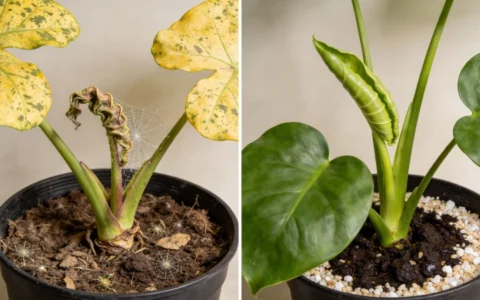
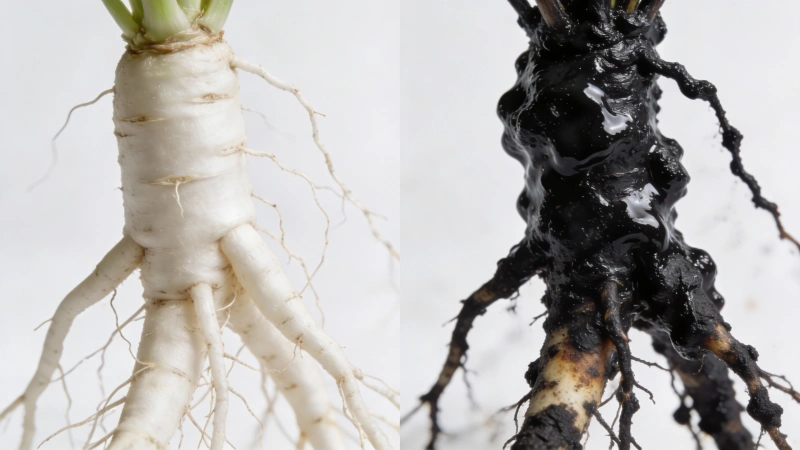
- Color: healthy roots are white or light tan. Rotting roots are brown or black.
- Texture: healthy roots are firm. Rotting roots are soft and mushy.
- Structure: the outer layer of rotting roots peels away easily, leaving a stringy “core” behind.
- Smell: rotting roots smell like rotten eggs or swamp water. Trust me — you’ll know it when you smell it.
Root Rot Diagnosis Checklist
| Symptom | Likely Cause | How to Confirm | Urgency |
|---|---|---|---|
| Yellow leaves + wilting + wet soil | Root rot | Check roots immediately | 🔴 High |
| Yellow leaves + wilting + dry soil | Underwatering | Water and observe for 24 hrs | 🟡 Medium |
| Soil smells musty or rotten | Root rot | Remove from pot now | 🔴 High |
| Fungus gnats present | Soil too wet / possible rot | Check soil moisture and roots | 🟡 Medium |
| Plant wobbles in pot | Severe root rot | Emergency root check | 🔴 High |
| Roots are black/brown and mushy | Confirmed root rot | Begin treatment immediately | 🔴 High |
What Causes Root Rot? (And How to Avoid Making It Worse)
Cause #1: Overwatering (The Most Common Culprit)
Let me clear up a common misconception: overwatering doesn’t mean giving too much water at once. It means watering too frequently — before the soil has had a chance to dry out. When soil stays constantly wet, roots can’t breathe. They need oxygen just like the rest of the plant. Waterlogged soil = suffocated roots = dead tissue = root rot.
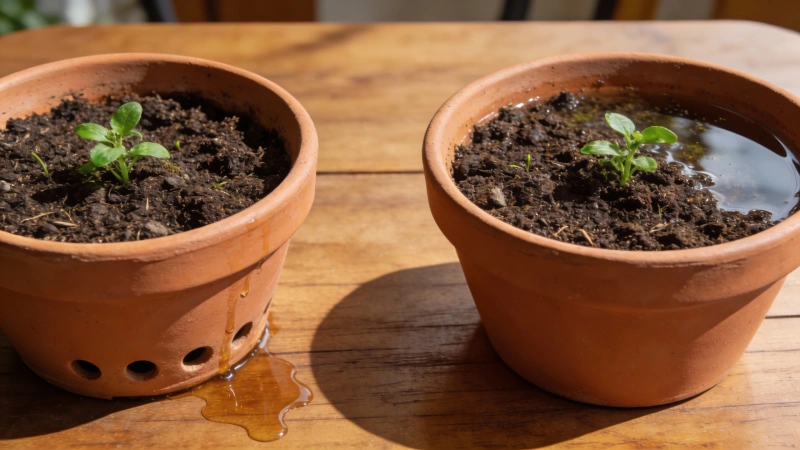
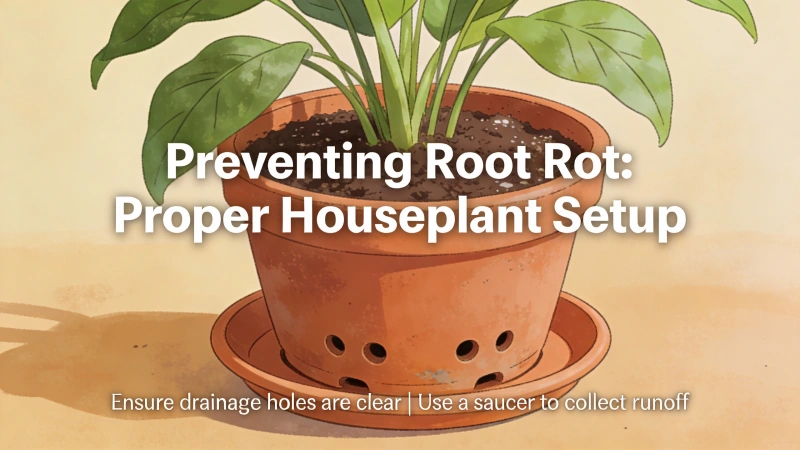
Cause #2: Poor Drainage
Even if you’re not overwatering, poor drainage can cause the same problem:
- Pots without drainage holes
- Soil that retains too much water
- Pots that are too large (more soil = slower drying)
- Water collecting in saucers or decorative pots
Cause #3: Fungal Contamination
Root rot fungi can spread through:
- Contaminated soil (old potting mix can harbor dormant spores)
- Reused drainage water (never reuse water that drains from one plant to water another)
- Fungus gnats — those annoying little flies actually spread root rot pathogens!
- Unsterilized tools
Root Rot Treatment: 7 Steps to Save Your Plant
Alright, let’s get to the rescue mission. Follow these steps carefully — skipping any of them can lead to the rot coming back.
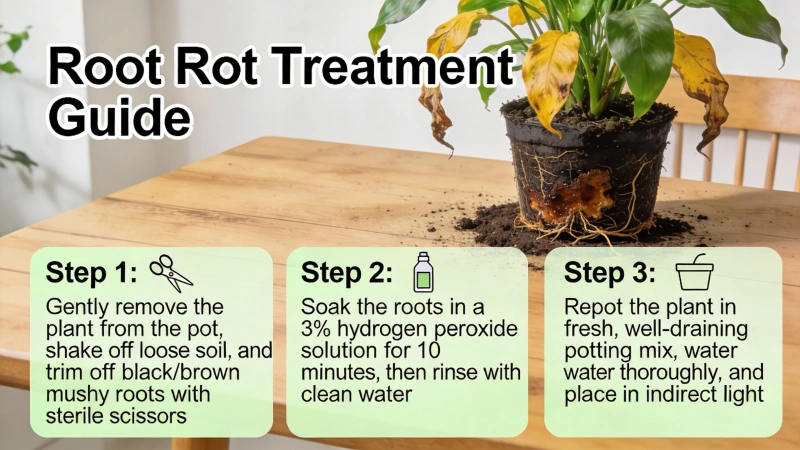
Step 1: Remove the Plant from Its Pot
Gently tip the pot and ease the plant out. Don’t yank or pull — you don’t want to damage whatever healthy roots remain. If the plant is stuck, run a knife around the inside edge of the pot or squeeze the sides if it’s plastic. Have newspaper or a tarp ready to catch the soil.
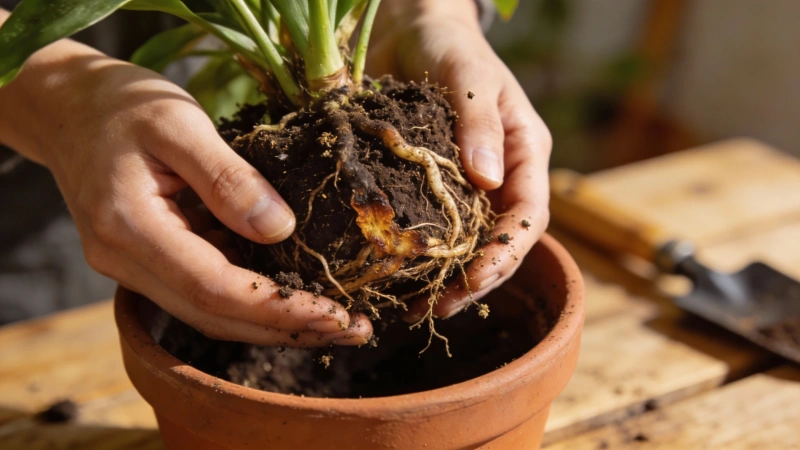
Step 2: Wash Away All Soil
Use lukewarm water (not cold — that can shock the roots) to gently rinse away all the potting mix. You need to see every root clearly to assess the damage. Be thorough but gentle. Rotting roots will start falling apart as you handle them — that’s actually helpful for identifying what needs to go.
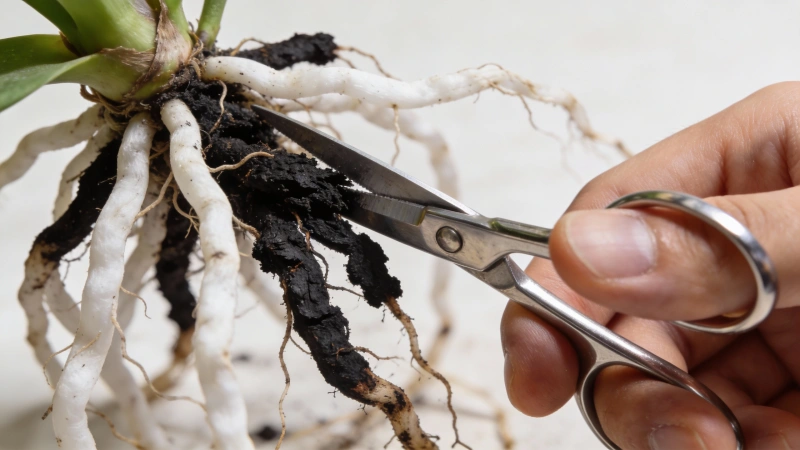
Step 3: Cut Away All Rotted Roots
This is the most important step. Using sharp, sterilized scissors or pruning shears, cut off every root that is:
- Black or dark brown
- Soft or mushy
- Slimy or falling apart
Cut about 1 cm above the rot, into healthy tissue. Healthy roots are white or light tan and feel firm.
Step 4: Treat with Hydrogen Peroxide (Highly Recommended)
This step is optional but I strongly recommend it. Hydrogen peroxide kills remaining fungal spores and adds oxygen to the root zone, which helps recovery.
| Purpose | H₂O₂ Concentration | Dilution Ratio | Method |
|---|---|---|---|
| Root soaking (treatment) | 3% | 1:2 (H₂O₂ to water) | Soak roots for 30 minutes |
| Soil drench (prevention) | 3% | 1:3 | Pour through soil until draining |
| Regular maintenance | 3% | 1:4 | Use every 3–4 waterings |
| Tool sterilization | 3% | Undiluted or 1:1 | Wipe or soak tools |
Step 5: Let Roots Air Dry
Set the plant in a shaded, well-ventilated area and let the roots air dry for 24 hours. This allows the cut surfaces to callus over, which prevents reinfection. Some people also dust the cut ends with cinnamon powder — it has natural antifungal properties and can help prevent reinfection.
Step 6: Repot in Fresh Soil
Never reuse the old soil. It’s contaminated with fungal spores. Use fresh, well-draining potting mix.
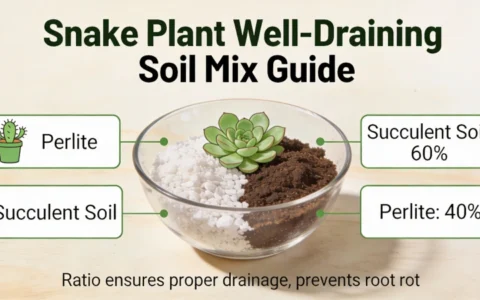
My recommended soil mix:
- 50% cactus/succulent potting mix
- 50% perlite
This creates a chunky, fast-draining mix that won’t stay soggy.
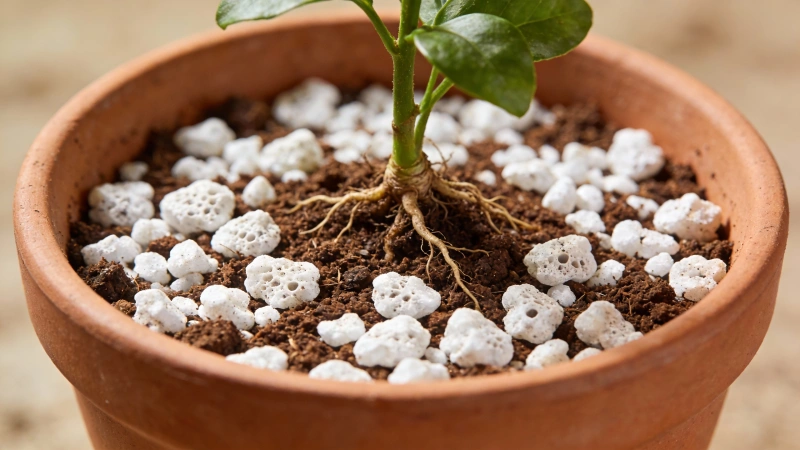
Choose the right pot size: if you removed a lot of roots, you need a smaller pot. A pot that’s too large holds too much water for a reduced root system, which can trigger another round of rot. If you’re reusing the old pot, wash it with a 1:9 bleach-to-water solution first to kill any lingering spores.
Step 7: Recovery Care
This is where patience becomes your best friend.
- Wait 1–2 weeks before watering. The roots need time to heal, and the remaining healthy roots can’t handle much water yet.
- Place in bright, indirect light. Avoid direct sun — the plant is already stressed.
- Ensure good airflow. Stagnant air encourages fungal growth.
- Don’t fertilize until you see new growth (usually 3–4 weeks minimum).
If your plant has lost more than 50% of its roots, it’s in critical condition. For more intensive rescue techniques, including how to take emergency cuttings, see my detailed guide on how to save a dying plant.
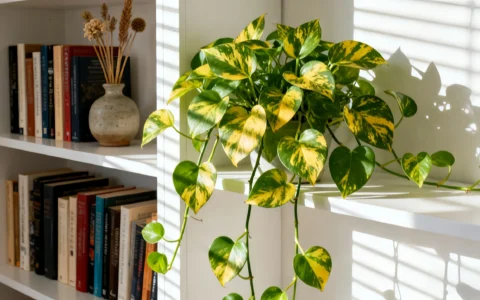
My Root Rot Rescue Story: How I Saved My Golden Pothos
The Setup
I’ve been growing houseplants for about three years now. At the time of this incident, I had around 20 plants, and my Golden Pothos was my absolute favorite — long trailing vines, beautiful variegation, growing like crazy. Or so I thought.
The Problem
It started last fall. A few leaves near the base started yellowing. No big deal, I thought — older leaves die off sometimes. But then more leaves started yellowing. And wilting. My first instinct? The plant must be thirsty. So I watered it more often. That was my biggest mistake. A week later, things were worse. Then I noticed tiny black flies hovering around the soil — fungus gnats. And when I leaned in close, I caught a whiff of something… off. Not terrible, but not right. Finally, I decided to check the roots. When I pulled the plant from its pot, my heart sank. About 40% of the root system was black, mushy, and falling apart.
The Treatment
- Washed all the soil off the roots with lukewarm water
- Used sterilized scissors to cut away every bit of rot (it hurt watching so many roots go)
- Soaked the remaining healthy roots in hydrogen peroxide solution (3%, diluted 1:2 with water) for 30 minutes
- Took 3 stem cuttings from healthy vines as “insurance” — just in case the main plant didn’t make it
- Let everything air dry for 24 hours
- Repotted in fresh cactus mix + perlite (50/50) in a terracotta pot with drainage holes
- Waited a full 2 weeks before the first watering
The Results
- Week 2: no change, but no further decline either
- Week 4: first new leaf appeared!
- Week 8: plant fully stabilized with multiple new leaves
- Total leaves lost: 6
- Insurance cuttings: all 3 successfully rooted
What I Learned
The biggest lesson: when leaves wilt, check the soil BEFORE adding more water. My instinct to water a wilting plant almost killed it. Now I always do the “finger test” — stick my finger 2–3 inches into the soil. If it’s moist at all, I don’t water.
Root Rot Severity and Success Rate
Wondering if your plant can be saved? Use this as a general guide:
| Root Loss | Severity | Recovery Rate | Recommended Strategy | Recovery Time |
|---|---|---|---|---|
| <30% | Mild | High (80%+) | Standard treatment | 2–4 weeks |
| 30–50% | Moderate | Medium (50–70%) | Treatment + take cuttings as backup | 4–6 weeks |
| 50–70% | Severe | Lower (30–50%) | Treatment + definitely take cuttings | 6–8 weeks |
| >70% | Critical | Low (<30%) | Focus on cuttings; treat main plant as bonus | 8+ weeks |
How to Prevent Root Rot: 10 Rules I Live By
Prevention is so much easier than treatment. Here’s what I’ve learned the hard way:
Watering Rules
- Never water on a schedule. Check the soil first — every single time.
- Use the finger test. Stick your finger 2–3 inches into the soil. Only water if it’s dry at that depth.
- Water less in winter. Plants slow down and need less water when days are shorter.
- When you water, water thoroughly. Let it drain completely from the bottom.
According to Iowa State University Extension, the most common cause of houseplant death is overwatering. Most indoor plants prefer to dry out somewhat between waterings.
Soil and Pot Rules
- Always use pots with drainage holes. No exceptions. Ever.
- Use well-draining soil. Add perlite to regular potting mix for better drainage.
- Don’t use pots that are too big. More soil = more water retention = higher rot risk.
- Consider terracotta. It’s porous and helps soil dry faster (though it also means more frequent watering).
Some plants are more prone to overwatering than others. Snake plants, for example, can go weeks without water — and killing them with kindness is extremely common. If you have a snake plant showing problems, read why a snake plant turns yellow to avoid this mistake.
Maintenance Rules
- Never reuse old potting soil. It may harbor dormant fungal spores.
- Don’t share drainage water. Water that drains from one plant can spread pathogens to another.
Frequently Asked Questions About Root Rot
Can a plant recover from severe root rot?
It depends on how much of the root system is damaged. If less than 50% of roots are affected, recovery rates are good with proper treatment. If more than 70% are gone, the plant’s chances are slim — but it’s still worth trying while also taking stem cuttings as backup. I’ve seen plants bounce back from seemingly hopeless situations.
How long does it take for a plant to recover from root rot?
You’ll typically see signs of new growth within 2–6 weeks if treatment was successful. Full recovery can take 2–3 months. During this time, resist the urge to overwater or fertilize. Patience is crucial.
Can I use hydrogen peroxide on any plant?
Yes, diluted 3% hydrogen peroxide (mixed 1:2 or 1:3 with water) is safe for most houseplants. It kills fungal pathogens and adds oxygen to the root zone. I’ve used it on everything from pothos to orchids without issues.
Should I throw away the old soil?
Absolutely. Fungal spores can survive in old soil for long periods. Always use fresh potting mix when treating root rot. If you want to be extra cautious, don’t even compost the old soil — just throw it away.
My plant’s leaves are yellowing — is it definitely root rot?
Not necessarily. Yellow leaves can be caused by many things: underwatering, overwatering, nutrient deficiency, low light, or even pests. The key diagnostic sign for root rot is yellowing/wilting while the soil is wet. For the full rundown of every cause, see my guide on why plants turn yellow. And if you notice tiny webs or stippling on the leaves, the problem might be pests instead — my guide on how to get rid of spider mites helps you rule that out.
Helpful Video Guide
If you’re more of a visual learner, this video walks through the root rot treatment process step by step:
Final Thoughts: Don’t Give Up on Your Plant
Root rot is scary. That first moment when you see those black, mushy roots and smell that awful smell — it’s easy to think your plant is beyond saving. But here’s what I’ve learned: plants are resilient. With quick action and proper treatment, many can bounce back from even severe root rot.
Remember the key steps:
- Act fast — the earlier you catch it, the better
- Cut away ALL the rot — don’t leave any behind
- Use hydrogen peroxide to kill remaining pathogens
- Repot in fresh, well-draining soil
- Wait before watering — patience saves plants
When I saw 40% of my Golden Pothos’s roots rotted away, I thought it was over. Eight weeks later, it was putting out new leaves. Now it’s one of the healthiest plants in my collection. Your plant can recover too. Give it a chance.
This article was created by a professional team. AI tools were used during the research and writing process to enhance efficiency and quality. All information has undergone manual verification and editing to ensure accuracy and practicality. We are committed to providing readers with objective and valuable content.
Publisher::Spring Mei,Please indicate the source when reposting:https://gardeningtoolsgarden.com/root-rot-treatment/