
Introduction
I got my first spider plant as a tiny 3-inch baby from a friend back in spring 2023. It looked so simple—just a few green and white striped leaves in a small pot. “These are impossible to kill,” she told me.
Well, she was mostly right. But “impossible to kill” doesn’t mean “impossible to mess up.”
Within three months, almost every leaf had brown tips. Six months in, still no babies. Some leaves turned yellow and droopy. I was doing something wrong, but I didn’t know what.
Fast forward 18 months, and that tiny baby is now a thriving mother plant with cascading runners and dozens of spiderettes. I’ve successfully propagated 8 new plants and shared 5 with friends and family.
The journey taught me a lot—mostly through trial and error. In this guide, I’ll share the 12 tips that actually made a difference. Whether you’re dealing with brown tips, wondering why your plant won’t produce babies, or just want to keep yours healthy, I’ve got you covered.
Let’s dive in.

Quick Answer: Spider Plant Care at a Glance
In short, spider plants need bright indirect light, water when the top 1-2 inches of soil are dry, and temperatures between 65-75°F. Feed monthly in spring and summer. The secret to getting babies? Keep your plant slightly rootbound.
Here’s your quick reference chart:
| Care Factor | Requirement |
|---|---|
| Light | Bright, indirect |
| Water | When top 1-2″ dry |
| Humidity | 40-60% (tolerates lower) |
| Temperature | 65-75°F (18-24°C) |
| Fertilizer | Monthly in spring/summer |
| Repotting | Every 2-3 years |
| Pet Safe | Yes (non-toxic) |
Now let me walk you through each of these in detail.
Understanding Spider Plants
Before diving into care tips, let’s get to know this plant a bit better.
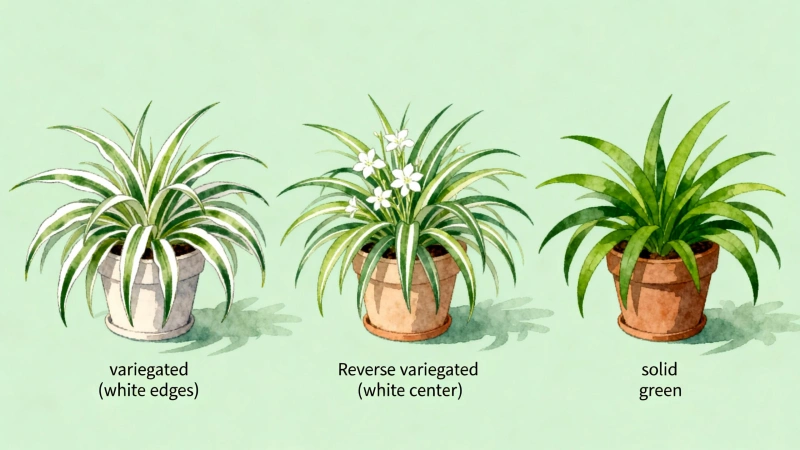
The spider plant’s scientific name is Chlorophytum comosum. It’s native to tropical and southern Africa, where it grows as a ground cover in forests.
You might also hear it called:
- Airplane plant
- Ribbon plant
- Spider ivy
- Hen and chickens
Why “spider” plant? When mature, it produces long, arching stems called runners. Baby plantlets dangle from these runners, looking like little spiders hanging from webs. It’s actually pretty cute.
Why spider plants are so popular:
- Nearly indestructible. They tolerate neglect like champs.
- Air purifying. NASA’s Clean Air Study found they help remove indoor pollutants.
- Long-lived. With proper care, they can live 30-40+ years.
- Pet safe. According to the ASPCA, they’re non-toxic to cats and dogs.
- Easy to propagate. One plant can become dozens.
Light Requirements
Getting the light right is crucial—especially if you want babies.
What Spider Plants Need
Ideal: Bright, indirect light. Think near a window but not directly in the sun’s path.
Best spots:
- 2-3 feet from an east-facing window
- Near a north-facing window
- A few feet back from south or west windows
Acceptable: Low light. They’ll survive, but growth slows significantly.
Avoid: Direct sunlight. It scorches the leaves, leaving brown or yellow patches.
My Experience with Light
My first mistake was putting my spider plant in a north-facing window that got very little light. It survived, but after 6 months—zero babies. Not even a single runner.
I moved it to an east-facing window where it gets morning light. Within a few months, the growth picked up noticeably. At month 14, the first runners finally appeared.
Signs Your Light Is Wrong
| Sign | What It Means |
|---|---|
| Vibrant colors, good growth | Light is perfect |
| Pale leaves, losing variegation | Not enough light |
| Yellow patches, scorched spots | Too much direct sun |
| No babies after 1+ year | Likely needs more light |
If your space is really low on natural light, consider a snake plant instead. They’re basically unkillable in low-light conditions.

Watering Guide
Watering is where most people go wrong. I certainly did.
The Golden Rule
When in doubt, don’t water. Spider plants prefer slightly dry conditions over soggy soil.
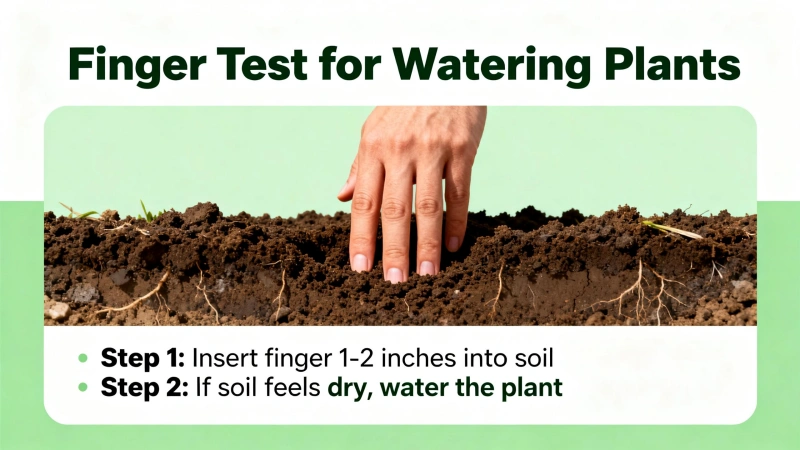
When to Water
Stick your finger into the soil about 1-2 inches deep. If it feels dry, water thoroughly. If it’s still moist, wait a few more days.
General frequency:
- Spring/Summer: Every 7-14 days
- Fall/Winter: Every 14-21 days
But don’t set a fixed schedule. Your home’s temperature, humidity, and light levels all affect how quickly soil dries.
How to Water
- Water thoroughly until it drains from the bottom
- Empty the saucer after 30 minutes
- Never let roots sit in standing water
The Water Quality Problem (This Is Important!)
Here’s something I wish I’d known from day one: tap water can cause brown tips.
Most tap water contains fluoride and chlorine. Spider plants are sensitive to these chemicals. Over time, they build up in the soil and damage leaf tips.
Solutions:
- Use distilled or filtered water
- Collect rainwater
- Let tap water sit out for 24 hours (helps chlorine evaporate, but not fluoride)
After I switched to filtered water, brown tips on new leaves dropped by about 90%. Seriously—it made that much difference.
My Watering Mistakes
Early on, I watered every 3 days because I thought more water = happier plant. Wrong. Leaves started yellowing. Some got mushy at the base.
I also used tap water directly. Brown tips everywhere.
Once I fixed both issues—watering only when dry and using filtered water—everything improved.
Overwatering vs. Underwatering Signs
| Symptom | Overwatering | Underwatering |
|---|---|---|
| Leaves | Yellow, soft, mushy | Dry, crispy, curling |
| Soil | Soggy, smells bad | Bone dry, pulling from pot edges |
| Roots | Brown, mushy | Dry, shriveled |
| Fix | Let dry out completely | Water thoroughly |
Soil and Repotting
Spider plants aren’t picky about soil, but drainage matters.
Best Soil Mix
Use any well-draining indoor potting mix. If you want to make your own:
- 1/3 regular potting soil
- 1/3 perlite (for drainage)
- 1/3 coco coir (for moisture retention)
The goal: soil that holds some moisture but doesn’t stay soggy.
When to Repot
Look for these signs:
- Roots growing out of drainage holes
- Water runs straight through without being absorbed
- Plant looks top-heavy or keeps tipping over
- Soil dries out within a day or two of watering
Generally, repot every 2-3 years.
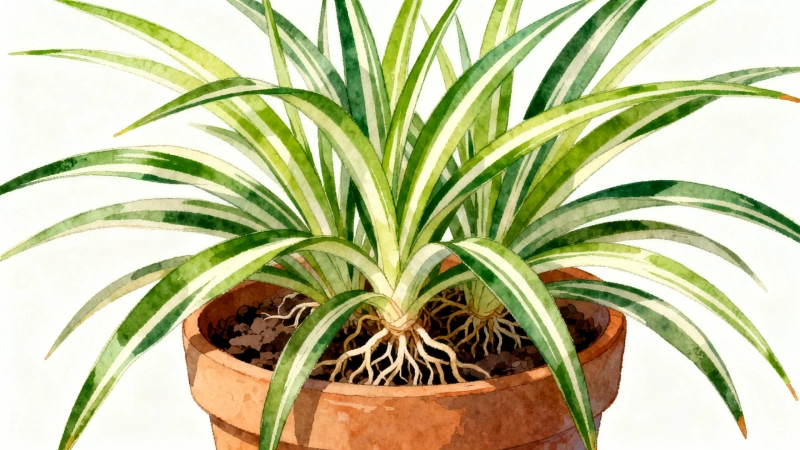
The Rootbound Secret
Here’s something counterintuitive: spider plants LIKE being slightly rootbound.
When roots have room to spread, the plant focuses energy on root growth instead of producing babies. A snug pot encourages flowering and baby production.
My mistake: I planted my 3-inch baby in an 8-inch pot. Way too big. It sat there for 6 months barely growing. When I moved it to a 4-inch pot, growth finally took off.
Repotting tip: Only go up 1-2 inches in pot diameter. No bigger.
Temperature and Humidity
Spider plants are pretty adaptable here, but there are some limits.
Temperature
Ideal range: 65-75°F (18-24°C)
Acceptable range: 55-90°F (13-32°C)
Avoid: Below 55°F (13°C). Cold temperatures cause damage and can kill the plant.
Keep them away from:
- Cold drafts from windows or doors
- Direct blasts from AC vents
- Heating vents (too hot and too dry)
Humidity
Spider plants are native to tropical regions, so they appreciate humidity. But they’re not demanding about it.
Ideal: 40-60%
Acceptable: Normal household humidity (usually 30-50%)
If your home is very dry—especially in winter with heating on—you might see more brown tips.
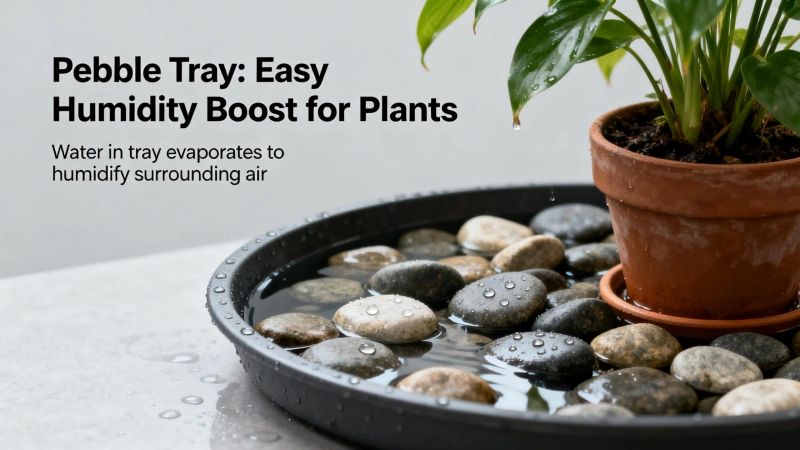
Ways to increase humidity:
- Use a humidifier
- Place on a pebble tray with water
- Group plants together
- Mist occasionally (but don’t overdo it)
Spider plants and pothos are both tropical plants that appreciate humidity. Grouping them together creates a little microclimate they both enjoy.
Fertilizing
Spider plants don’t need much food, and overdoing it causes problems.
When to Fertilize
- Spring and Summer: Once a month
- Fall and Winter: Skip it entirely. The plant is dormant.
What to Use
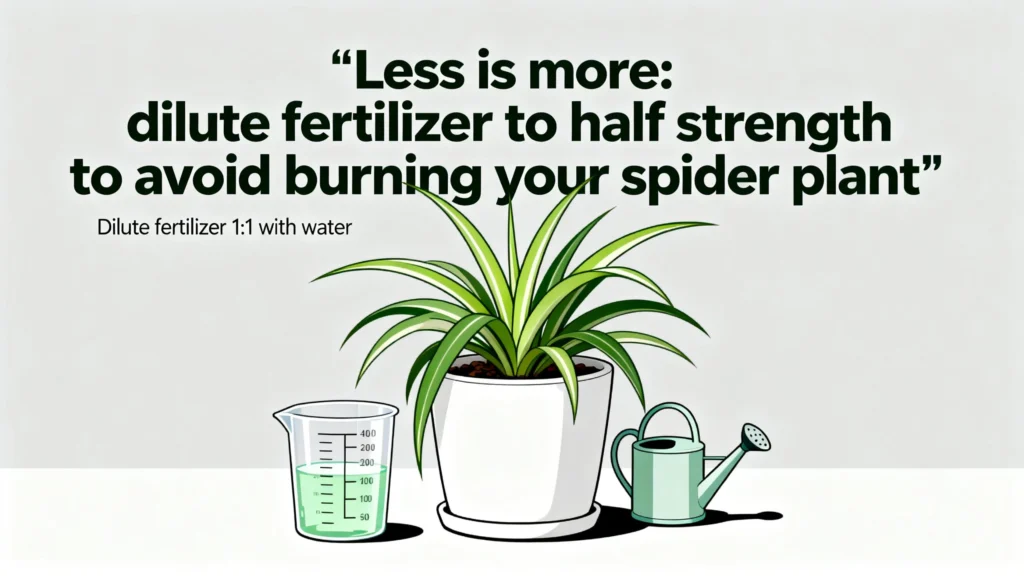
Any balanced, water-soluble houseplant fertilizer works. Look for something like 20-20-20 or 10-10-10.
Important: Dilute to half the recommended strength. Spider plants are sensitive to fertilizer burn.
Dangers of Over-Fertilizing
Too much fertilizer causes:
- Salt buildup in soil
- Brown leaf tips and edges
- Root damage
Sound familiar? Yep—brown tips can come from fertilizer, not just water quality.
How to Fix Salt Buildup
Every 2-3 months, flush the soil:
- Take the plant to a sink or outside
- Water thoroughly with plain water
- Let it drain completely
- Repeat 2-3 times
- Allow to drain fully before returning to its spot
This washes out accumulated salts and gives the roots a fresh start.
How to Fix Brown Tips
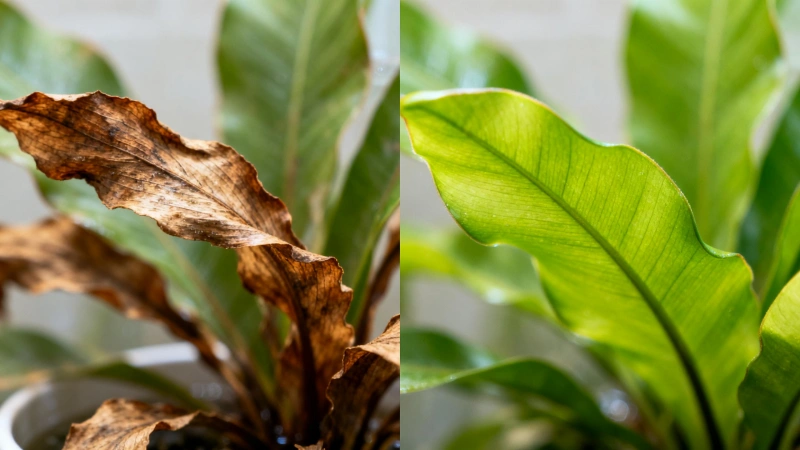
Brown tips are the #1 complaint from spider plant owners. I dealt with them for months before figuring out what was going on.
Let’s break down the causes and fixes.
Cause 1: Water Quality (Most Common)
Tap water contains fluoride and chlorine. Spider plants hate both. These chemicals build up in the soil over time and damage leaf tips.
Fix: Switch to distilled, filtered, or rainwater. If you must use tap water, let it sit out for 24 hours—though this only helps with chlorine, not fluoride.
Cause 2: Over-Fertilizing
Too much fertilizer = salt buildup = burned tips.
Fix: Reduce fertilizing to once a month (spring/summer only). Flush soil with plain water every 2-3 months.
Cause 3: Low Humidity
Dry air, especially in winter when heating is running, dries out leaf tips.
Fix: Increase humidity with a humidifier, pebble tray, or by grouping plants together.
Cause 4: Direct Sunlight
Harsh sun scorches leaves, starting at the tips.
Fix: Move to a spot with bright but indirect light.
Cause 5: Inconsistent Watering
Both overwatering and chronic underwatering stress the plant.
Fix: Water only when the top 1-2 inches are dry. Be consistent.
How to Trim Brown Tips
Brown tips won’t turn green again. But you can trim them:
- Use sharp, clean scissors
- Cut at an angle, following the leaf’s natural pointed shape
- Don’t cut into the green part—leave a tiny sliver of brown
This keeps the plant looking tidy without causing additional stress.
My Brown Tips Story
For the first 3 months, almost every leaf on my spider plant had brown tips. I tried misting. I tried moving it to more humid spots. I reduced fertilizer.
Nothing worked.
Then I read about fluoride sensitivity on a gardening forum. Our city water has relatively high fluoride levels. I switched to filtered water from my Brita pitcher.
Within a month, the new leaves coming in had perfect green tips. The difference was dramatic.
Now all my houseplants get filtered water. It’s a small change that made a huge difference.
Brown Tips Diagnosis Chart
| Symptom Pattern | Likely Cause | Solution |
|---|---|---|
| Tips only, otherwise healthy | Water quality | Use distilled/filtered water |
| Tips + crispy edges | Low humidity | Increase humidity |
| Tips + pale/faded leaves | Over-fertilizing | Flush soil, reduce feeding |
| Tips + burnt spots on leaves | Direct sunlight | Move to indirect light |
| Tips + yellow/mushy leaves | Overwatering | Let soil dry out more |
How to Get Spider Plant Babies
This is the fun part. Those dangling baby plants (spiderettes) are what make spider plants so special.
But what if your plant isn’t producing any?
Why Your Spider Plant Has No Babies
Reason 1: It’s Too Young
Spider plants need to mature before reproducing. Most won’t produce babies until they’re at least 1 year old—sometimes 2.
Fix: Be patient. Keep caring for it, and the babies will come.
Reason 2: Not Enough Light
This is the most common reason for mature plants not producing babies.
As the Laidback Gardener explains, spider plants can survive in low light for years, but they won’t bloom or produce babies without adequate light. Light is energy, and making babies takes energy.
Fix: Move to a brighter spot with indirect sunlight.
Comment
byu/Squirrelnoacorn from discussion
inplants
Reason 3: Pot Is Too Big
When roots have lots of room to spread, the plant focuses on root growth instead of reproduction.
Fix: Keep your spider plant slightly rootbound. Don’t rush to repot.
Reason 4: Temperature Too Low
Spider plants produce runners and flowers best in warm temperatures (65-75°F).
Fix: Move away from cold drafts. Keep in a consistently warm room.
Reason 5: Nutrient Imbalance
Both over-fertilizing and under-fertilizing can affect baby production.
Fix: Feed monthly in spring/summer with half-strength fertilizer.
Tips to Encourage Babies
Based on my experience and research, here’s what works:
- Give it bright, indirect light – At least 6-8 hours daily
- Keep it slightly rootbound – Don’t repot until necessary
- Fertilize in growing season – Monthly, spring through summer
- Maintain warm temps – 65-75°F is ideal
- Let soil dry between waterings – Slight stress can trigger reproduction
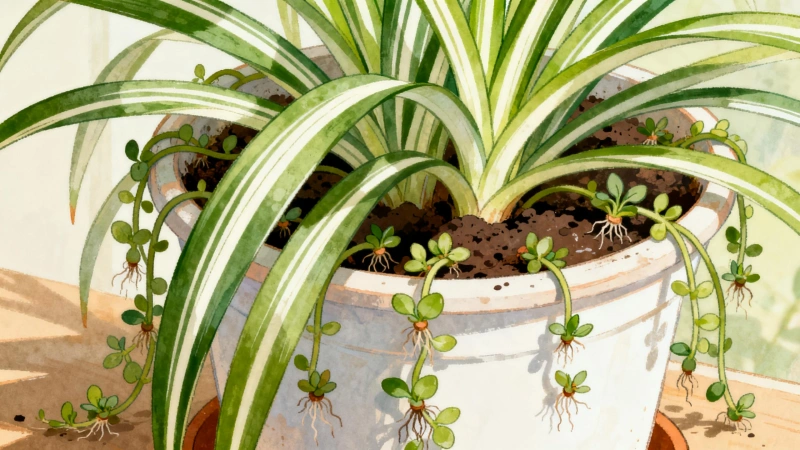
How Babies Form
Here’s the process:
- Long, arching stems (runners) grow from the plant’s center
- Small white flowers appear along the runners
- After flowers fade, tiny plantlets form where flowers were
- Plantlets develop their own leaves and small root nubs
- Eventually, they’re ready to be propagated
The whole process takes several weeks to a couple months.
How to Propagate Spider Plant Babies
Once you have babies, propagating them is easy. I’ve tried all three methods below.
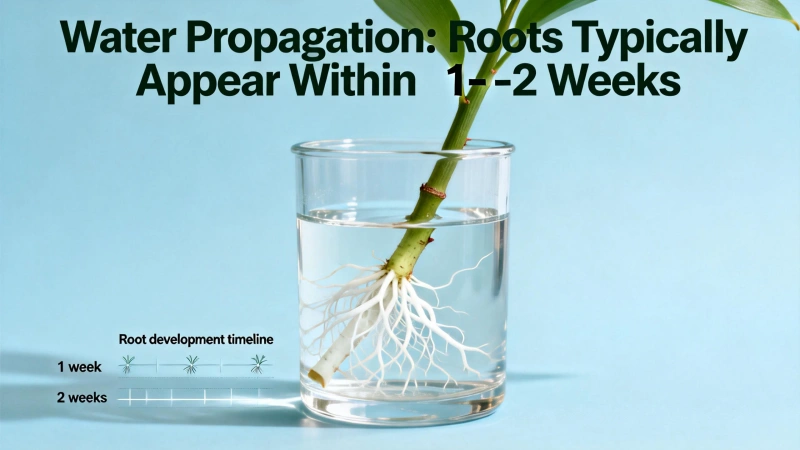
Method 1: Water Propagation (Most Popular)
This is the classic windowsill-jar method.
Steps:
- Wait until the baby is 2-3 inches across with visible root nubs
- Cut the runner, removing the baby from the mother plant
- Place in a small jar of water
- Submerge only the roots—keep leaves above water
- Change water every 7-14 days to keep it fresh
- Once roots are 2-3 inches long, transplant to soil
Pros: You can watch roots grow. Fun!
Cons: Water roots need to adapt when moved to soil.
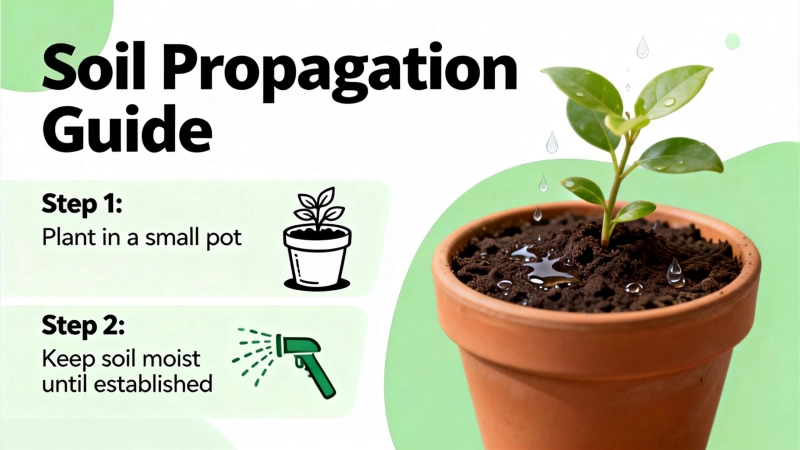
Method 2: Direct Soil Propagation (Higher Success Rate)
This skips the water step entirely.
Steps:
- Wait for visible root nubs on the baby
- Cut baby from the runner
- Plant in a small pot (3-4 inches) with well-draining soil
- Keep soil consistently moist (not soggy) until established
- Place in bright, indirect light
Pros: No transplant shock. Often faster establishment.
Cons: Less exciting—you can’t see the roots grow.
Method 3: Still-Attached Propagation (Safest)
Let the baby root while still connected to mom.
Steps:
- Place a small pot of soil next to the mother plant
- Position the baby on top of the soil
- Use a paperclip or small stone to hold it in place
- Keep the soil moist
- Once rooted and growing, cut the runner
Pros: Baby gets nutrients from mother while rooting. Nearly foolproof.
Cons: Requires space and the right setup.
Common Propagation Mistakes
Avoid these errors that I learned the hard way:
- ❌ Cutting babies too small – Wait until they’re 2-3 inches with root nubs
- ❌ Drowning leaves in water – Only roots should be submerged
- ❌ Using too large a pot – Excess soil stays wet and causes rot
- ❌ Planting too deep – Don’t bury the crown (center) of the baby
- ❌ Overwatering soil-planted babies – Keep moist, not soggy
My Propagation Results
In 18 months, I’ve propagated 8 new spider plants from my original. The first attempt? Only 30% survived—I cut them too small and planted too deep.
Now my success rate is around 95%. The key is patience: wait for decent-sized babies with visible root nubs.
If you enjoy propagating plants, Monstera propagation is another fun project. Unlike spider plants, Monsteras need a stem node to root successfully—different technique, but equally rewarding.
Common Problems and Solutions
Beyond brown tips, here are other issues you might encounter.
Quick Diagnosis Table
| Problem | Possible Cause | Solution |
|---|---|---|
| Yellow leaves | Overwatering, low light | Let soil dry; increase light |
| Brown tips | Tap water, low humidity, over-fertilizing | Use filtered water; increase humidity; flush soil |
| Pale/faded leaves | Not enough light | Move to brighter spot |
| No babies | Young plant, low light, pot too big | Wait; more light; smaller pot |
| Drooping leaves | Underwatering, severely rootbound | Water thoroughly; repot if needed |
| Slow growth | Low light, needs fertilizer | More light; feed monthly in growing season |
| Mushy base | Overwatering, root rot | Check roots; repot in dry soil; reduce watering |
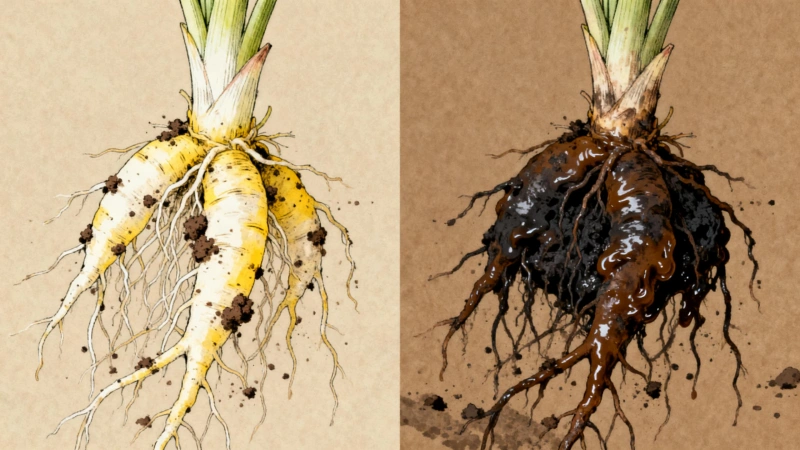
Checking for Root Rot
If leaves are yellowing AND soil is constantly wet, check the roots.
Healthy roots: White or light tan, firm
Rotting roots: Brown or black, mushy, smell bad
If you find root rot:
- Remove plant from pot
- Trim away all mushy roots with clean scissors
- Let roots air dry for a few hours
- Repot in fresh, dry soil
- Wait several days before watering
- Water less frequently going forward
Pest Control
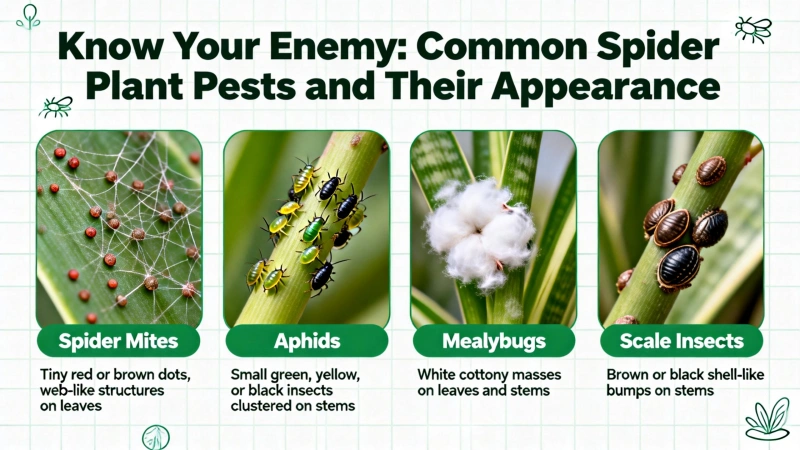
Spider plants are relatively pest-resistant, but problems can happen.
Common Pests
Mealybugs
- Look like white cottony spots
- Hide in leaf joints and under leaves
- Treatment: Wipe with alcohol-soaked cotton swab; spray with neem oil
Aphids
- Tiny green, black, or white insects
- Cluster on new growth
- Treatment: Rinse with water; use insecticidal soap
Spider Mites
- Tiny red or brown dots on leaf undersides
- Leave fine webbing
- Treatment: Increase humidity; spray with neem oil; wipe leaves
Prevention Tips
- Check plants regularly, including leaf undersides
- Quarantine new plants for 2 weeks before placing near others
- Keep good air circulation
- Don’t overwater (soggy soil attracts fungus gnats)
- Clean leaves occasionally to remove dust
Houseplants can sometimes attract other pests into your home. If you notice stink bugs appearing, check out that guide for elimination tips.
Pet Safety
Good news for pet owners!
According to the ASPCA (American Society for the Prevention of Cruelty to Animals), spider plants are non-toxic to cats and dogs.
This makes them one of the safest houseplants if you have pets.
A Word of Caution
While non-toxic, spider plants can still cause mild issues if pets eat too much:
- Cats are especially attracted to the long, grass-like leaves
- Eating large amounts may cause vomiting or upset stomach
- The leaves can also be a choking hazard
My suggestion: Hang your spider plant or place it somewhere pets can’t reach. The dangling babies are irresistible to playful cats.

FAQ
How often should I water my spider plant?
There’s no fixed schedule. Check the soil—when the top 1-2 inches are dry, water thoroughly. This usually means every 7-14 days in summer, every 14-21 days in winter. Your home’s conditions will affect frequency.
Why isn’t my spider plant producing babies?
The most common reasons are: the plant is too young (under 1 year), not getting enough light, or the pot is too big. Make sure it’s in bright indirect light and slightly rootbound.
Can I cut off brown tips?
Yes! Use sharp scissors and cut at an angle following the leaf’s natural shape. But also address the underlying cause—usually water quality, low humidity, or over-fertilizing—or new leaves will develop brown tips too.
Can spider plants live in a bathroom?
Absolutely, if there’s a window providing adequate light. The higher humidity in bathrooms is actually beneficial and can help prevent brown tips.
Can I grow spider plants outdoors?
In USDA zones 9-11, spider plants can grow outdoors year-round. In cooler zones, you can move them outside in summer but bring them in before frost. Outdoors, keep them in shade to avoid leaf burn. If planting in the ground, be aware that moles and other garden pests may disturb the roots.
How long do spider plants live?
With proper care, spider plants can live 30-40 years or more. I’ve read about people inheriting 40+ year old spider plants from grandparents. They’re true heirloom plants.
Should I remove all the babies?
You don’t have to. But if there are too many, they drain energy from the mother plant. I recommend propagating most of them and leaving just a few for the trailing look.
Do spider plants need a moss pole?
No. Spider plants are trailing plants, not climbers. They look best in hanging baskets or on high shelves where the leaves and babies can cascade down naturally.
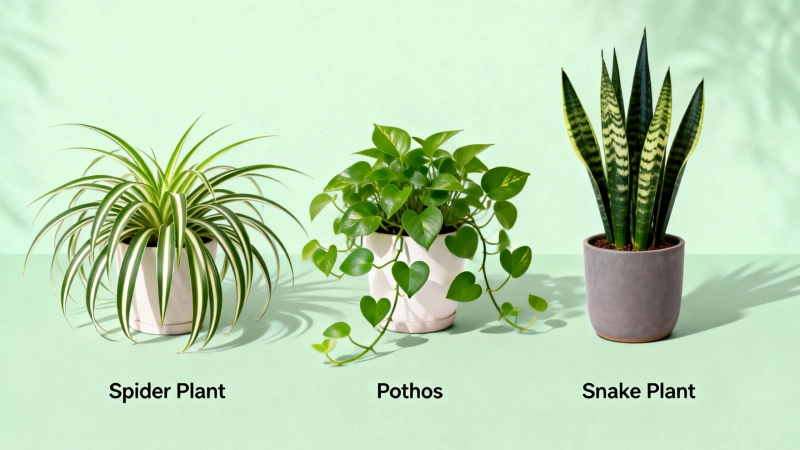
Related Plants You Might Like
If you enjoy spider plants, you’ll probably like these easy-care houseplants too:
- Pothos – Another nearly indestructible plant. Can trail or climb. Tolerates low light well.
- Snake Plant – Even more low-maintenance than spider plants. Thrives on neglect. Perfect for dark corners.
- Monstera – For when you want a bigger statement plant. Those iconic split leaves are worth the extra space.
These plants look beautiful grouped together and have similar care requirements.
Conclusion
Spider plants truly deserve their reputation as one of the easiest houseplants. Even after all my early mistakes—overwatering, wrong light, tap water—mine bounced back and thrived.
Here’s what made the biggest difference for me:
- Bright, indirect light – Essential for healthy growth and babies
- Filtered or distilled water – The #1 fix for brown tips
- Letting it stay slightly rootbound – The secret to getting spiderettes
If you’re struggling with your spider plant, don’t give up. Check the basics: light, water quality, pot size. Small adjustments often lead to dramatic improvements.
And once your plant starts producing babies? Share them! There’s something satisfying about propagating new plants and passing them along to friends. That tiny baby my friend gave me has now become plants in five different homes.
Happy growing!
This article was created by a professional team. AI tools were used during the research and writing process to enhance efficiency and quality. All information has undergone manual verification and editing to ensure accuracy and practicality. We are committed to providing readers with objective and valuable content.
Publisher::meiruth558@gmail.com,Please indicate the source when reposting:https://gardeningtoolsgarden.com/how-to-care-for-a-spider-plant-12-tips-i-learned-after-18-months-2025/